User Administration in LINUX/UNIX
User administration describes the ability for administrators to manage user access to various IT resources like systems, devices, applications, storage systems, networks and more. In this article, we will see and learn about User Administration in Linus/UNIX.
There are three types of accounts on a Linux/Unix system :
Root account
This is also called superuser and would have complete and unfettered control of the system. A superuser can run any commands without any restriction. This user should be assumed as a system administrator.
System accounts
System accounts are those needed for the operation of system-specific components for example mail accounts and the sshd accounts. These accounts are usually needed for some specific function on your system, and any modifications to them could adversely affect the system.
User accounts
User accounts provide interactive access to the system for users and groups of users. General users are typically assigned to these accounts and usually have limited access to critical system files and directories.
Unix supports a concept of Group Account which logically groups a number of accounts. Every account would be a part of another group account. A Unix group plays important role in handling file permissions and process management.
Managing Users and Groups
There are four main user administration files −
/etc/passwd − Keeps the user account and password information. This file holds the majority of information about accounts on the Unix system.
/etc/shadow − Holds the encrypted password of the corresponding account. Not all the systems support this file.
/etc/group − This file contains the group information for each account.
/etc/gshadow − This file contains secure group account information.
Check all the above files using the cat command.
The following table lists out commands that are available on majority of Unix systems to create and manage accounts and groups :

Create a Group
We will now understand how to create a group. For this, we need to create groups before creating any account otherwise, we can make use of the existing groups in our system. We have all the groups listed in /etc/groups file.
All the default groups are system account specific groups and it is not recommended to use them for ordinary accounts. So, following is the syntax to create a new group account −
groupadd [-g gid [-o]] [-r] [-f] groupnameThe following table lists out the parameters :
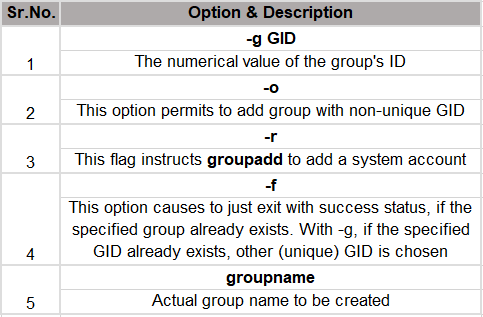
If you do not specify any parameter, then the system makes use of the default values.
Following example creates a db2dba group with default values, which is very much acceptable for most of the administrators.
$ groupadd db2dbaModify a Group
To modify a group, use the groupmod syntax −
$ groupmod -n new_modified_group_name old_group_nameTo change the db2dba_2 group name to oracledba, type −
$ groupmod -n oracledba oracledba_2Here is how you will change the financial GID to 545 −
$ groupmod -g 545 oracledbaDelete a Group
We will now understand how to delete a group. To delete an existing group, all you need is the groupdel command and the group name. To delete the financial group, the command is −
$ groupdel oracledbaThis removes only the group, not the files associated with that group. The files are still accessible by their owners.
Create an Account
Let us see how to create a new account on your Unix system. Following is the syntax to create a user's account −
useradd -d homedir -g groupname -m -s shell -u userid accountnameThe following table lists out the parameters :
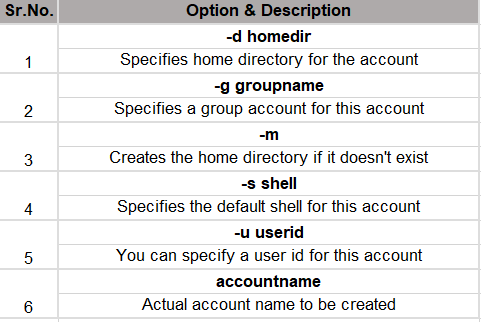
If you do not specify any parameter, then the system makes use of the default values. The useradd command modifies the /etc/passwd, /etc/shadow, and /etc/group files and creates a home directory.
Following is the example that creates an account imjhachandan, setting its home directory to /home/imjhachandan and the group as db2dba. This user would have Korn Shell assigned to it.
$ useradd -d /home/imjhachandan -g db2dba -s /bin/ksh imjhachandanBefore issuing the above command, make sure you already have the db2dba group created using the groupadd command.
Once an account is created you can set its password using the passwd command as follows −
$ passwd imjhachandan06
Changing password for user imjhachandan06.
New UNIX password:
Retype new UNIX password:
passwd: all authentication tokens updated successfully.
When you type passwd accountname, it gives you an option to change the password, provided you are a superuser. Otherwise, you can change just your password using the same command but without specifying your account name.
Modify an Account
The usermod command enables you to make changes to an existing account from the command line. It uses the same arguments as the useradd command, plus the -l argument, which allows you to change the account name.
For example, to change the account name imjhachandan to imjhachandan06 and to change home directory accordingly, you will need to issue the following command −
$ usermod -d /home/imjhachandan06 -m -l imjhachandan imjhachandan06Delete an Account
The userdel command can be used to delete an existing user. This is a very dangerous command if not used with caution.
There is only one argument or option available for the command .r, for removing the account's home directory and mail file.
For example, to remove account imjhachandan06, issue the following command −
$ userdel -r imjhachandan06If you want to keep the home directory for backup purposes, omit the -r option. You can remove the home directory as needed at a later time.
Commentaires